Will's Notes
From EQUIS Lab Wiki
This page is where I'm going to post notes and comments about what I'm doing.
Contents |
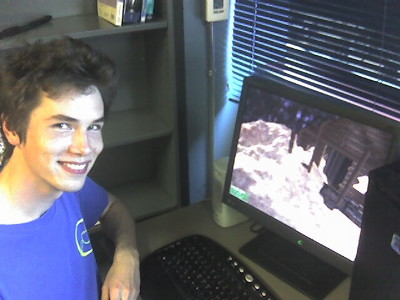
Recent Screenshot


Introduction
Life is a Village is a project to research video game design where the game has a significant integrated exercise component. The game is currently under development; this wiki site is to report progress on the concept game and to document the design and implementation of the game program.
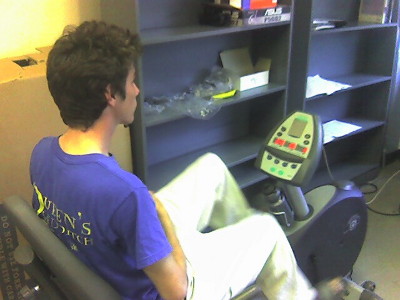
- Go to the Tunturi Protocol page to read about designing the interface to our stationary bicycle.
- Go to the CAX Dependencies page to read about software components we are using and how to get and install them.
- Go to the CAX Game Architecture page to read about our game design.
- Go to my Doxygen documentation of the project
- See our Development Plan for goals we've already reached and future work.
- See my CAX Rough Notes for some online musings about problems I had while building the prototype game
We are using a free graphics rendering engine called OGRE for our 3D backend. Ogre is written in C++, and so our project is too.
Description of the Game Program
You are a robot standing on a grassy plain beside a range of mountains; in front of you is a river which flows out of the hills into a lake. Behind you is a pine forest where you can collect wood for constructing things. To your right are some scattered log cabins, representing a village. Directly in front of you, across the river and next to the cabin on top of the hill is a green ninja, one of the villagers (the only one, in fact) under your control.
Go into the forest and find one of the forest resource nodes (currently an Ogre head placeholder model), representing the wood contained in the forest's trees. When you approach it closely enough, the game will ask you to assign a villager to cutting down trees in the region by flashing a message over the rendered scene. You can press the "1" button on the joystick to perform the action, or simply leave the region to cancel. Performing the action will assign an idle villager to cutting down trees around the forest node you found. The villager starts near the village and must walk to the forest node to start chopping wood; this typically takes a minute or two. The villager will automatically and repeatedly find a tree near the resource node, cut it down (removing it from the game world), and return to a cabin in the village to drop off the chopped wood.
Keyboard Control
The arrow keys and the standard WADS keys move the avatar on the keyboard. Other important keys are
- In normal program operation:
- Arrow UP and W move the avatar forwards
- Arrow DOWN and S apply the brake
- LEFT and RIGHT and A and D turn the avatar left and right
- ESCAPE exits the program
- PAGE UP / PAGE DOWN shift the avatar's "gears" up and down
- ENTER is the equivalent of the "1" joystick button, allowing you to cut down trees, etc.
- HOME and END pitch the camera up and down
- PRINT SCREEN takes a screenshot image and saves it to the current working directory
- B inserts a building (switch to building insert mode)
- In building insert mode:
- Arrow keys and WADS move the building.
- B inserts the building
- DEL cancels the building insert
- Q and E rotate the building
Mouse Control
Moving the mouse changes the camera view and turns the avatar. Pressing the left mouse button makes the avatar walk forwards; the right button is mapped to the brake.
Joystick Control
The joystick's right thumbstick controls the camera view and avatar direction much like the mouse. The left thumbstick controls moving forwards and braking, much like the forward and back keys on the keyboard.
- In normal game operation, the buttons work as follows:
- 2 and the two right trigger buttons (6 and 8) control the brake
- 3 changes the gear down; 4 changes the gear up
- 1 is the action button, used to cut down trees, etc.
- the small 10 button inserts a building
- in building insert mode:
- the right stick positions the building
- 3 and 4 rotate the building left and right
- 2 is used to cancel building insert
- the small 10 button confirms the building insert
About the Game Program
The Ogre render system handles loading of model data, configuration of the graphics hardware, rendering (controlled by high-level parameters), and memory management for all visual information. It also contains a small library of static objects which we are using as placeholders until the final game models are completed. These stock objects in the game include the tree models and the avatar model (robot).
The input manager handles input from a variety of devices (including the Tunturi bicycle and our cordless joystick) and its configuration is specified in a separate configuration file which is loaded at runtime for maximum flexibility. Input feedback is provided via the bicycle interface, as the render loop updates the tension on the bicycle brake to reflect the difficulty of moving in the game world. Various filters and prediction heuristics are applied to this tension adjustment to compensate for a high hardware latency on the bicycle device. One joystick controls the camera and turns the avatar; for steep camera pitch angles, the camera tracks along the ground behind the avatar. (Bug Note: the camera occasionally zooms too close to or far away from the avatar, causing flicker and ugly clipping). Since the bicycle input tends to persist after the user stops pedalling (sensor start-up lag is 3s, shut-off lag is 6s), one of the joystick buttons implements a brake to stop the avatar from moving forwards. There is also a gearing system implemented in software to allow the user to move faster at the expense of greater pedalling difficulty.
The buildings in the game world are static unmoving objects with potentially complex behaviour. Firstly, they own a mesh object in the Ogre rendering system, which must be loaded, configured, and positioned. They may have multiple animations and associated sounds; they are solid objects, against which moving objects must perform collision detection. The need to specify these various parameters independently for each building led to the creation of building specification files, which allow these properties to be encoded in XML and loaded at runtime.
The terrain in the game world is generated procedurally from a human-painted resource map by a Python script; a matching XML file details how the resource map is interpreted (see details here: Heightmap Generation). This script can also generate alpha maps for the various resource types painted on the resource map; this is how the tree models in the game world are currently planted. The game loads the tree alpha map and drops trees onto those parts of the terrain coloured white in the alpha map.
Villagers are non-player characters controlled by a simple artificial intelligence manager. Villagers must be able to navigate across the terrain (pathfinding and steering) and must be able to modify their behaviour to suit their current job and environment (controlled by the rule-based-system described below).
The user interacts with the world (assigning villagers to tasks) primarily by approaching an object in the game world, causing a proximity-based trigger to fire; however, other important user functions (e.g., building a house) have their own buttons since they cannot be triggered by environment position. The event-handling code which is responsible for producing the game behaviour is divided into components called triggers (and their associated callback functions) and game states, which can actually replace the entire main game loop. The current game state has its tasks executed in the game main loop; it usually checks an array of trigger objects, which may fire events to change the current game state. For instance, cutting down trees in the forest is the result of the following actions on the part of the user:
- approach the forest resource node, firing the proximity trigger
- the proximity trigger changes the game state to an action state which keeps track of what action is being considered and checks the input manager for input confirming or denying the action
- the user presses the action button to confirm the action. this event is detected by the action game state, which performs the action and returns the game to the standard game state. the proximity trigger that was responsible for flagging the action state in the first place is temporarily disabled (until the user's avatar moves out of range) so that the action state will not be immediately repeated.
Compiling the Project under Visual C 7
- Install and configure OGRE and make sure that it works (see these notes). The environment variable $OGRE_HOME should be set to the ogrenew directory of the OGRE version you want to compile against.
- (Optional): Install and configure the PLSM2 and make sure that it works (see these notes).
- Download the project from our subversion repository (see these notes) and compile.
Distributing the Binary
From copying the demo application to Irina's computer today, I've worked out a list of things to do to get the runtime working.
- Install the Microsoft .NET 2003 and C++ Standard Runtime Libraries. The Visual C++ Toolkit 2003 package contains all the required components.
- Install the DirectX 3D 9 libraries. Sadly, Ogre's D3D9 render system links against the directx 9 dll, which is named differently depending on what version is being used. We're using the June 2005 SDK, so you must have that version on the client computer. Apparently, the required library (d3dx9_26.dll) is not in the end-user install package, but only in the developer redistributable SDK (35MB) and the full SDK packages (162MB).
- Install the OpenAL end-user library for sound support. You can get the Windows end-user installer here.
There is a snapshot of a recent stable compile in the subversion reposity, in the folder concept\stable which should run as long as the above two prerequisites are met.
About the Hardware We Are Using
KCP Boxes (x 2)
Intel P4 3.00Ghz Prescott
1024MB RAM
Win XP-SP2
ATI Radeon X700 PRO
16x DVD-ROM, USB, FireWire, 100T Ethernet
LG 1710S 17" LCD Monitor
SmartBoard
6 May: Lost administrator password reset using a Linux boot disk.
IBM IntelliStation Pentium III  1.0GHz 256K L2
512MB SDRAM
Win2000
8 GB IBM SCSI HD (via Adaptec AIC-7892 Ultra 160/m)
NVidia GeForce MX5500 AGP 2x  128MB
Samsung CD-ROM
Fast Ethernet, FireWire, USB
6' rear projection screen
Open-Source / Free Links
See my big list of Tools I'm Using.
Game Engine Links
This project will use the following APIs:
- The Object-Oriented Graphics Rendering Engine (OGRE) for graphics with Open Dynamics Engine (ODE) physics linkage
- The OpenAL sound library for sound
- The Simple Direct Media Layer library (SDL) for input devices such as joysticks
Below are a list of links to other gaming resources. Most of these links are taken from this list here:
Learning Computer Graphics
Computer graphics isn't as complicated as it seems sometimes. Some links to help when you don't know what's going on.
- NeHe's OpenGL tutorials
- Ogre Tutorials
- Advanced Animation and Rendering Techniques (ISBN 0201544121)
Other Graphics / Game Engines / Libraries
Open-Source Gaming Projects
- The Motorsport Project is using OGRE and ODE and a bunch of other libraries to build a realistic racing simulator. It might be worth taking a look at their input framework and sound libraries.
- The FlightGear Flight Simulator project is developing an open-source high-realism flight simulator.
Physics Engines and Frameworks
- Tokamak is a physics simulation library. Free for non-commercial use.
- The Newton Game Dynamics library is another physics library; reviews I've read say it has good realism but not-so-hot performance; also, it doesn't have good integration with OGRE.
- The Open Physics Abstraction Layer (OPAL) is a "high-level interface for low-level physics engines used in games, robotics simulations, and other 3D applications". It currently runs on top of ODE.
- The Open Dynamics Framework is another physics framework which sits on top of low-level physics engines. Currently uses ODE, and integration with the NovodeX engine is planned. No OGRE integration.
Networking
Sound Libraries
Image Libraries
- OGRE uses the DevIL imaging library to push pixels around.
- ImageMagick is a popular and well-established open-source set of command line tools for image manipulation.
- NetPbm
- The Python Imaging Library is an imaging library for Python.
Modelling Links
- Irina's Modelling Notes
- Blender, and open-source 3d editor and renderer
Modelling Planets
- Image Collection for bump-mapping and texturing planets.
- A similar offering by Bjorn Jonsson.
- Earth images
- Public domain vector descriptions of Earth geometry.
- Bump-mapping using Cg scripts.
Making Trees
Making Terrain
- Terragen is a "work-in-progress scenery generator for Windows and the Mac OS". Currently free for non-commercial use.
- Perlin noise is a kind of continuous noise function which may be computed in any number of dimensions you want. Two dimensional perlin noise is often used to make mountain heightfields or cloud textures; three-dimensional noise can produce volumetric clouds. Some links about perlin noise:
- brief-ish intro
- excellent discussion of perlin noise
- LibNoise is a C++ library for fast generation of Perlin noise
- Read about our attempts to generate virtual terrains:
Making Tileable Textures
- There are a variety of ways of creating tiling textures using the GIMP, a free graphics editor:
- The Filters -> Render -> Clouds -> Solid Noise tool in GIMP will create a random tileable texture which you can colour using Filters -> Colors -> Map -> Color Range Mapping.... Below are some textures I made this way:


- Resynthesizer is a downloadable GIMP plugin that will synthesize a texture from an image of your choosing. Check out the web site for details. Below are some tiling textures I made this way from photos I took of Kingston (free for non-commercial use):


- The Filters -> Render -> Clouds -> Solid Noise tool in GIMP will create a random tileable texture which you can colour using Filters -> Colors -> Map -> Color Range Mapping.... Below are some textures I made this way:


