Janus
From EQUIS Lab Wiki
Contents |
Overview
Janus is a toolkit designed to handle consistency maintenance aspects of a multiplayer computer game. It provides a high level interface that the game programmer can use without worrying about how the consistency and data sharing are done behind the scenes.
Janus (pronounced YAH-noos) is named after Janus the Roman god of gates, doors, doorways, windows, beginnings and endings. Janus also had the ability to see into both the past and the future. Similarly, users of the Janus toolkit are able to access the game state at any point in the past or future.
For more information and pointers to publications on Janus, see our project web page.
Download
The Janus Toolkit and some of the sample applications can be downloaded here http://equis.cs.queensu.ca/~equis/Janus/JanusToolkit-7.20120126.zip
Note these files work with Visual Studio 2010. Some of the sample applications also require Microsoft XNA 4.0.
If you use Janus, please let us know. This helps us when applying for funding to continue the project.
TimeLine Objects
Within Janus, the shared data are modeled as TimeLines which contain all past, present and future values of the shared data. Each element in the TimeLine contains an object representing the shared state variables and the time associated with that state. The shared state variable object may be as simple as a single integer, for example representing the health points of an entity in a game, or it may be any arbitrarily complex object containing multiple properties such as the position, heading and velocity of an entity. Although the time values stored in the TimeLine are the actual date and time values, the programmer always accesses the data using relative time with zero (0) meaning now and +10 being 10 ms in the future and -10 being 10 ms in the past, etc.
Timelines are composed of:
- Get/set operations that access the timeline’s value at a given time;
- Interpolation and extrapolation functions that estimate values for times when no known value exists in the timeline; and
- A remote update function that processes timeline updates from remote peers.
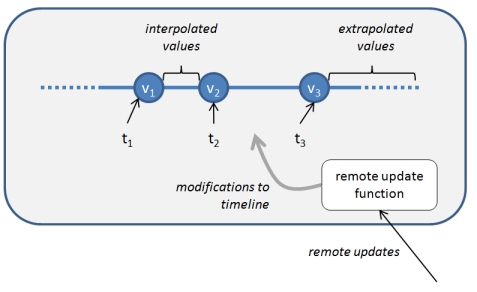
The following figure shows the elements of the timelines model: a timeline includes a set of past and future known values (v1, v2,...), along with the times at which they hold (t1, t2,...). Values between these times are computed using an interpolation function, and values after these times are estimated using an extrapolation function. A remote update function determines how updates received from peers are inserted into the timeline.
TimeLine objects essentially have two methods available for the programmer: Set and Get.
Set Method
The Set method is used to store the state locally as well as broadcast the state to all remote clients who have subscribed to that timeline object. The Set method takes two parameters:
- the time, and
- the new value for the state variable.
For example to set the current health points to 25 for an integer-type TimeLine representing the health of an entity named entityHealth, the code would be:
entityHealth.Set(0, 25);
Similarly to set the health points to 35 at 100 ms in the past, the code would be:
entityHealth.Set(-100, 35);
Normally only one client should store values into an individual timeline. If two clients attempt to write to the same timeline, the writes may conflict and result will be unpredictable.
Get Method
The Get method is used to retrieve the value of an object from the TimeLine. The Get method takes just one parameter which is the time for which the value is to be retrieved. The Get method will perform one of three actions depending upon what values are stored in the TimeLine:
- Return a value from the TimeLine,
- Use interpolation to calculate a value, or
- Use extrapolation to calculate a value
If a value exist in the TimeLine at the specified time, then that value is returned. If there is no value for that time, but there is a value before that time and a value after that time, then interpolation is used to calculate and return a value. The interpolation function can be simple stepwise interpolation (i.e. hold previous value) or linear interpolation between the two points or a more complex algorithm may be implemented such as using heading and velocity data or polynomial interpolation. If all the values in the TimeLine are before the requested time then extrapolation will be used to calculate and return a value. Again, any of a variety of algorithms may be used for extrapolation. When using the Get method, the programmer does not need to be aware of whether interpolation or extrapolation is being used.
Base on the previous example for entityHealth (and assuming that linear interpolation is being used), if the programmer wanted to access the health points at 50 ms in the past,
int healthPoints = entityHealth.Get(-50);
would return 30 and store it in the local variable healthPoints, automatically using interpolation to calculate the a value between the two known values of 25 and 35.
Similarly, if the programmer wanted to access the health points at 50 ms in the future,
int healthPoints = entityHealth.Get(50);
would return 20 and store it in the local variable healthPoints, automatically extrapolating past the last known value of 25.
Constructor
The constructor for a timeline object requires one parameter, the string name of the timeline. If IntegerTimeLine is an implementation of a timeline containing integer values, then
IntegerTimeLine entityHealth = new IntegerTimeLine("player1Health");
creates a local instance of the “player1Health” timeline. If two clients both create instances of the “player1Health” timeline, Janus synchronizes both instances. The timeline’s remote update function specifies how updates arriving over the network are to be applied. Whenever a timeline is updated by assigning a new value at a given time, an update message is sent to any synchronized instances on other clients. By default, the remote update function adds the incoming update into the timeline at the correct location.
Implementation
The Janus toolkit is written in C# using Microsoft Visual Studio 2010. It is built on top of the Lidgren Networking Library (code.google.com/p/lidgren-network-gen3) which provides the necessary networking infrastructure. To improve the efficiency changes were made to the Lidgren source code to combine the Lidgren and Janus networking thread. Detail of the changes are described here.
Distributed Architecture
From the developer’s point of view, Janus has a peer-to-peer architecture. That is, updates are automatically routed between peers that share the same timeline, and all data is fully replicated. If a server is required, one of the peers can be allocated a server role.
In the current implementation of Janus, we have developed a centralized message router (TimeLine Server)to implement this peer-to-peer communication. The router is based on a distributed publish and subscribe architecture. Timeline synchronization is implemented by peers subscribing to updates for the timeline in question. Updates are multiplexed so that one socket can be used to synchronize any number of timelines.
A name is associated with each instance of a TimeLine object. When a client creates a TimeLine object with a given name, the name is passed to the TimeLine server and client automatically subscribes to updates for that object. When a client stores a new value to a TimeLine object using the Set method, the value and the time associated with it are sent to the TimeLine server which forwards the data to all other clients who have subscribed to that TimeLine object.
Basic Instructions for Using Janus for Consistency Maintenance
This section contains some instructions showing the minimal steps required to use an existing TimeLine class for sharing the state of an entity in a simple XNA game.
1) Add the following projects to your solution.
   Janus
   TimeLineServer
2) Add the following lines to your game program:
   using Equis.JanusToolkit;
   using Equis.JanusToolkit.StandardTimeLines;
plus add a Reference to Janus in your project.
3) Currently there are several choices of TimeLines you can use. Likely one of these will work for you or can be used with only minor modifications.
   FloatTimeLine                         - single floating point number
   IntTimeLine                           - single integer
   PositionHeadingVelocityTimeLine       - floats for position, heading and velocity
   PositionHeadingVelocity2TimeLine       - floats for position, heading and velocity
                                               with an override on SetFromRemote that performs smooth corrections
   PositionTimeLine	                - 2 floating point values
   PositionRotationTimeLine		- avatar position and rotation in radians
   XYStatusTimeLine		        - 3 integers
4) Here is some sample client code using a PositionTimeLine for the X and Y coordinates of a game entity. First declare the variable
PositionTimeLine enemyPosition;
Initialize the stream and give it a name
enemyPosition = new PositionTimeLine ("enemy");
The update part:
Note: if you need to use the elapsed time between updates to calculate a new position, you should use Janus.ElapsedMS() instead of gameTime.
   protected override void Update(GameTime gameTime)
   {
       //
       // The first line in the Update method should be Janus.StartUpdate();
       //
       Janus.StartUpdate();
       //
       // get the elapsed time from Janus.ElapsedMS() - do not use gameTime
       //
       int elapsedMS = Janus.ElapsedMS();
       //
       //calculate new position based on the previous position, elapsed time and velocity
       //
       float newX = oldX + (float) elapsedMS * velocityX;
       float newY = oldY + (float) elapsedMS * velocityY;
       //
       // save the position locally and broadcast it to the remote clients by doing a Set
       // if you use t = 0, that will be current time
       // if you use t = 100, that will give 100 ms local lag
       //
       enemyPosition.Set(t, new Position(newx, newy);
       //
       // save the current position to use as the initial position in the next update
       //
       oldX = newX;
       oldY = newY;
       //
       // The last line in the Update method should be Janus.EndUpdate();
       //
       Janus.EndUpdate ();
   }
The drawing part:
Note: Use the Get method to get the position at which to draw the entity. You should always call the Ready method before calling Get. Ready ensures that there is at least one value in the time line
   protected override void Draw(GameTime gameTime)
   {
       Janus.Freeze();
       spriteBatch.Begin(SpriteBlendMode.AlphaBlend);
       if (enemyPosition.Ready())   // need this before doing Get
       {
           Position enemyPos = enemyPosition.Get(0);
           Vector2 enemyXY = new Vector2(enemyPos.X, enemyPos.Y);
           spriteBatch.Draw(
           s.Sprite,
           enemyXY,            // x y coordinates of where it is
           null,               // clip rect
           Color.White,        // tint
           0.0f,
           s.Centre,           // origin of rotation
           1.0f,               // scale
           SpriteEffects.None, // horiz/vertical flip
           0);                 // depth value (0..1; 0 = front)
       }
       spriteBatch.End();
       base.Draw(gameTime);
       Janus.UnFreeze();
    }
Getting it Running
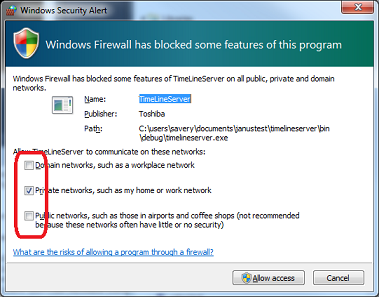
First compile and run the TimeLineServer console application. The first time you run the TimeLine server, you will be prompted to allow clients access to the TimeLine through the windows firewall. Select the appropriate level of access depending upon where you intend to run the clients.
Next, start your client application. The client begins searching for the TimeLineServer on the local machine. If it does not find it, you will be prompted to enter the IP address of the TimeLineServer. See The TimeLineServer and Setting the Server IP address section for more details.
Other Useful Stuff
Determining the Client Number
It is often necessary to be able to uniquely identify each client in a distributed application. The variable ClientNumber contains such a unique value.
int PlayerNumber = Janus.ClientNumber;
The value is set by the TimeLineServer and should not be modified. ClientNumber contains an integer which represents the clients connection number on the time line server. The first client to connect to the server will be 0. The next client will be 1, etc. If a client disconnects from the server, that client number will be freed up and may be reused by the next client to connect to the time line server. Note, you must connect to the server either by creating a TimeLine object or by using the ConnectToServer method prior to attempting to use this variable.
Changing the interpolation or extrapolation method
All timelines have a default interpolation and extrapolation method. Typically this is linear interpolation and extrapolation. This can be changed by calling the SetInterpolationType and SetExtrapolationType methods, after the timeline has been created.
   PositionTimeLine pointerPosition = new PositionTimeLine("pointer1");
   pointerPosition.ExtrapolationType = PositionTimeLine.stepping;
Currently the choices for interpolation type are: stepping, linear and quadratic. Although not all of them have been implemented for every timeline class.
Reducing Bandwidth Requirements
By default, the Janus Toolkit does little to minimize the number and size of messages passed between clients. However, several features are available that dramatically reduce bandwith requirements.
These are:
- Reducing message frequency by changing the values of Janus.DefaultSendMS, TimeLine<ValueType>.MinSendMS and TimeLine<ValueType>.SendAllValues
- Reducing message frequency by adjusting TimeLine<ValueType>.Tolerance and calculating the difference between the actual position and that predicted by remote clients
- Reducing message size by overriding the ValueToByteArray and ByteArrayToValue methods
Each of these features is described in detail below.
DefaultSendMS, MinSendMS and SendAllValues
Each timeline object contains the property SendAllValues. By default this property is set to true which causes all update messages to be propagated over the network. Setting SendAllValues to false, allows the programmer to control the frequency with which messages are sent by adjusting the properties: DefaultSendMS and MinSendMS.
DefaultSendMS is a property of the Janus class. When SendAllValues is false, it determines the minimum frequency at which update messages are sent. By default the value is 50ms. Thus if a value is updated (or Set) every 20ms, it is only sent over the network when a minimum of 50ms have elapsed from the previous time a message was sent. To send more updates, the value of DefaultSendMS should be decreased. To reduce bandwidth requirements, the value of DefaultSendMS should be increased.
Each timeline object contains the property MinSendMS. By default the value of MinSendMS is -1, and the value of Janus.DefaultSendMS is used to determine how frequently messages are sent. If MinSendMS is set to a positive value, then it overrides Janus.DefaultSendMS and messages for that particular timeline are sent at the frequency specified by MinSendMS.
Tolerance and Difference
When using Janus TimeLines, each client keeps track of which values have been sent over the network. Prior to sending an update, the client performs a check to determine whether or not remote clients can accurately predict the new updated state. Only if the remote client is unable to predict the new state within a set error tolerance will the new state be transmitted.
The parameter Tolerance is used to set the threshold value for sending updates over the network. It is used on conjunction with the method Difference which calculates the difference between two values in a TimeLine. By default, Tolerance is set to 0 and Difference returns 999.9. Thus, by default the transmission of updates is controlled by time as described above. The tolerance can be changed as follows:
myTimeLine.Tolerance = 2.0;
The following example overrides the default implementation of Difference for the PositionHeadingVelocityTimeLine. In this example we calculate the euclidean distance between the X and Y coordinates.
   protected override double Difference(PositionHeadingVelocity val1, PositionHeadingVelocity val2)
   {
       float x = val1.X - val2.X;
       float y = val1.Y - val2.Y;
       return Math.Sqrt(x * x + y * y);
   }
ValueToByteArray and ByteArrayToValue
By default, the Janus Toolkit uses object serialization to convert objects to a byte array for transmission over the network. This has the advantage of making it simple to create new Timeline classes without the need to worry about how the data is transmitted. However, it is very inefficient when it comes to the size of the messages. Reducing the message size can be accomplished by simply overriding the methods ValueToByteArray and ByteArrayToValue. The code below shows how this is done for the XYFlipTime line from the Fish example. The XYFlip time line object contains two floating point numbers, X and Y, and one integer Flip.
   protected override byte[] ValueToByteArray(XYFlip v)
   {
       byte[] byteArrayX = BitConverter.GetBytes(v.X);
       byte[] byteArrayY = BitConverter.GetBytes(v.Y);
       byte[] byteArrayFlip = BitConverter.GetBytes((Int16) v.Flip);
       byte[] byteArray = new byte[byteArrayX.Length + byteArrayY.Length + byteArrayFlip.Length];
       byteArrayX.CopyTo(byteArray, 0);
       byteArrayY.CopyTo(byteArray, byteArrayX.Length);
       byteArrayFlip.CopyTo(byteArray, byteArrayX.Length + byteArrayY.Length);
       return byteArray</font>;
   }
   protected override XYFlip ByteArrayToValue(byte[] byteArray)
   {
       float x = BitConverter.ToSingle(byteArray, 0);
       float y = BitConverter.ToSingle(byteArray, 4);
       int flip = BitConverter.ToInt16(byteArray, 8);
       return new XYFlip(x,y,flip);
   }
Classes and Methods
Documentation can be found at http://equis.cs.queensu.ca/~equis/Janus/doc/html/N_Equis_JanusToolkit.htm
Several example classes have been created which inherit from the TimeLine<Value> and CommandTimeLine<Value> classes. Documentation for these classes can be found at http://equis.cs.queensu.ca/~equis/Janus/doc/html/N_Equis_JanusToolkit_StandardTimeLines.htm
Creating Additional Timeline Classes
Several TimeLine classes exist and can be used to create new applications. However at some point, you will likely want to create a new class specifically tailored to your application.
We will look at the steps required to create a new TimeLine class by reviewing the PositionTimeLine class. This class stores an X and Y position of a game object as two floating point values.
The first step in creating a PositionTimeLine is to create a class to hold the X and Y values. In this example the class is called Position. It contains two properties: X and Y. The Position class must implement Serializable, and it must also have a constructor that takes no parameters. The Position class is shown below:
   [Serializable]
   public class Position
   {
       public float X;
       public float Y;
       //
       // Constructor with two parameters
       public Position(float _x, float _y)
       {
           X = _x;
           Y = _y;
       }
       //
       // Constructor with no parameters - required for serialization
       public Position()
       {
       }
   }
Now that you have a Position class, you need to create a TimeLine class that stores position objects
   public class PositionTimeLine : TimeLine<Position>
   {
The PositionTimeLine class normally should provide delegates for both interpolation and extrapolation. The delegates must take an integer parameter, representing time and return a Position object. The type of interpolation and extrapolation function used may be linear, quadratic or any arbitrarily complex function. In this example, we show a delegate for linear interpolation. A similar delegate should also be created for extrapolation. If no delegate is provided simple stepping interpolation and extrapolation will be used.
Note: multiple interpolation and extrapolation delegates may be created allowing the programmer to switch among various interpolation and extrapolation functions during program execution if desired.
       // example of an interpolation delegate
       protected  Position LinearInterpolation(int t)
       {
           Value<Position> prev = ValueBefore(t);
           Value<Position> next = ValueAfter(t);
           int elapsedTime = next.Time - prev.Time;
           //
           Position prevVal = prev.Val;
           Position nextVal = next.Val;
           //
           float prevX = prevVal.X;
           float nextX = nextVal.X;
           //
           float prevY = prevVal.Y;
           float nextY = nextVal.Y;
           //
           float resultX = (float)(1.0d * (t - prev.Time) / elapsedTime * nextX + 1.0d * (next.Time - t) / elapsedTime * prevX);
           float resultY = (float)(1.0d * (t - prev.Time) / elapsedTime * nextY + 1.0d * (next.Time - t) / elapsedTime * prevY);
           //
           return new Position(resultX, resultY);
       }
The PositionTimeLine class must override the methods for setting the interpolation and extrapolation type. Sample code for setting the interpolation type is shown below. The code for setting the extrapolation type is similar. The values for interpolation type are defined in the TimeLine<ValueType> class. Currently three types exist: stepping, linear and quadratic. Additional types may be added as required.
       protected override void SetInterpolationType(int type)
       {
           switch (type)
           {
               case linear:
                   Interpolate = new InterpolationDelegate(LinearInterpolation);
                   break;
               //
               case stepping:
                   Interpolate = new InterpolationDelegate(SteppingInterpolation);
                   break;
               //
               default:
                   Interpolate = new InterpolationDelegate(LinearInterpolation);
                   break;
           }
       }
Finally, you must have a constructor for the PositionTimeLine class. The constructor requires one parameter, the name of the TimeLine, and it must set the default interpolation and extrapolation delegates.
       public PositionTimeLine(String name)
           : base(name)
       {
           Interpolate = new InterpolationDelegate(LinearInterpolation);
           Extrapolate = new ExtrapolationDelegate(LinearExtrapolation);
       }
Command Timelines
The timelines model makes it easy to access shared state data at any point in time. However, the same is not true for command type data, such as “shoot” or “crouch”. There is no method to interpolate or extrapolate these types of actions and thus each command must be accessed individually. We have experimented with various options for integrating commands into our timelines model. Some options include, allowing the programmer to access a list of commands that occurred over a time range, or using a more event driven model for commands, possibly delaying events based on the command timestamp.
Sample Applications
A variety of sample applications have been created which illustrate the features of the Janus Toolkit. These applications can be found under the JanusToolkit\Examples.
Telepointer
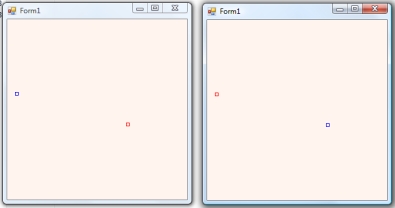
This is a simple windows forms application which shares the position of a telepointer between two application. The image below shows two windows running the Telepointer application.
A short video of the application can also be seen at http://www.youtube.com/watch?v=tqefd7Z6CBM
To run the application, first compile and run the TimeLineServer console application.
Then compile and run the Telepointer application.
Next start up a second instance of the Telepointer application on either the same computer or on another computer. The position of the telepointer will be shared between the two applications.
Telepointer Trails
This application uses the XNA framework and demonstrates the use of telepointer trails. The image below shows a screen shot of the application displaying two remote telepointers.

To run the application, first compile and run the TimeLineServer console application.
Then compile and run the TelepointerXNA application. Note: you must have Microsoft's XNA framework installed in order to compile this application.
Next start up a second instance of the TelepointerXNA application on either the same computer or on another computer.
Fish
This application uses the XNA framework and implements the simplest possible game in XNA. It also demonstrates use of the local lag algorithm. The image below shows a screen shot of the application. Each player control one of the fish and can move their fish using the arrow keys or the WASD keys.

To run the application, first compile and run the TimeLineServer console application.
Then compile and run the Fish application. Note: you must have Microsoft's XNA framework installed in order to compile this application.
Next start up a second instance of the Fish application on either the same computer or on another computer.
Tank Shooting Game
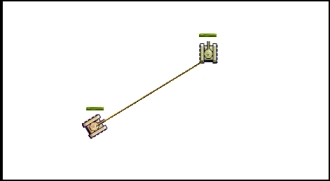
The tank shooting game is another XNA application. In the game, two players control tanks and attempt to shoot at the opposing player's tank. A screen shot of the application is shown below.
This application illustrates several additional features of the Janus Toolkit. The game includes both a client and a server application. The client sees his own actions in real-time, but sees a lagged version of the remote client. The client controls the local tank and fires at the other tank, however the server determines whether a hit was made based on the shooter's frame of reference. We term this algorithm the Half-Life algorithm as it is used by the Half-Life Series of first person shooter games. See http://developer.valvesoftware.com/wiki/Latency_Compensating_Methods_in_Client/Server_In-game_Protocol_Design_and_Optimization for further details.
To run the application, first compile and run the TimeLineServer console application.
Next, compile and run the TanksServer console application.
Finally compile and run the TanksClient application. Note: you must have Microsoft's XNA framework installed in order to compile this application.
Next start up a second instance of the TanksClient application on either the same computer or on another computer.
Smooth Corrections
Our final example shows how smooth positional corrections can be implemented using timelines.
In a networked application, the simplest way of handling position corrections is to immediately move (or “warp”) the avatar to the new position. This can have a jarring effect as an avatar suddenly jumps across the screen. An alternative solution, is to have the avatar move quickly to the new position.
In this application we show how smooth corrections can be implemented by overriding the timeline’s default remote update function.
Remote updates are normally handled by adding the incoming value to the timeline at the appropriate time. This approach replicates the timeline on all clients that have access to it. For smooth corrections, however, we purposely wish the timelines to diverge – when a local client receives a correction, the local timeline is modified to gradually move towards a consistent state.
To run the application, first compile and run the TimeLineServer console application.
Then compile and run the BallsSmooth application. Note: you must have Microsoft's XNA framework installed in order to compile this application. The first time you run the application, you will be prompted to enter the IP address of the computer on which the TimeLineServer is running.
Next start up a second instance of the BallsSmooth application on either the same computer or on another computer.
If the latency over the network is low, the advantage of smooth corrections will not be apparent. Thus we have induced synthetic lag to...
The TimeLineServer and Setting the Server IP address
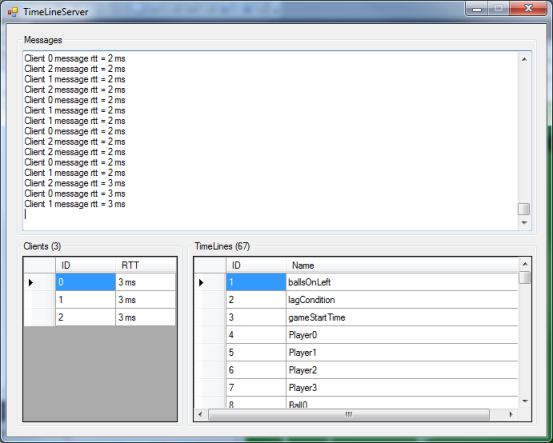
The TimeLineServer acts as a message router between clients using Janus TimeLines. The TimeLineServer receives messages whenever a client updates a TimeLine objects and it forwards the message to all clients who have subscribed to updates for that TimeLine. The TimeLineServer also provides a variety of information related to the status of your application. The top panel of the form shows the console log, the bottom left panel shows client id numbers assigned to the clients connected to the TimeLineServer. It also show the round trip time (rtt) for messages sent from the timeline server to each client. If this number starts to grow, you will experience networking problems with your application. Check out the section on Reducing Bandwidth Requirements for suggestions on how to correct this. Finally, the bottom right panel show a list of all the timelines that are connected to the TimeLineServer.
The TimeLineServer application must always be started prior to starting up any client applications. The application may be started directly or one client may initiate the TimeLineServer application by adding the TimeLineServer as a reference and by executing the following code prior to creating any timelines.
   TimeLineServer tls = new TimeLineServer();
   tls.Start();
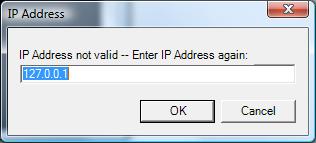
The IP address for the TimeLineServer is stored in the text file Janus.cfg. The file is located in the same folder as the executable. If there is no file found, or the program does not find the TimeLineServer running at the IP address specified in the file, then you will be prompted to enter the IP Address at runtime. After successfully entering an IP address, it will be written to the janus.config file.
The format of the Janus.cfg is as follows:
LidgrenNetwork
       Address = 127.0.0.1
       Port = 14242
       SimulatedLoss = 0
       SimulatedDuplicatesChance = 0
       SimulatedMinimumLatency = 0
       SimulatedRandomLatency = 0
A Janus.cfg is also used for the TimeLine Server. It has an identical format except that it does not include an IP Address.
LidgrenNetwork
       Port = 14242
       SimulatedLoss = 0
       SimulatedDuplicatesChance = 0
       SimulatedMinimumLatency = 0
       SimulatedRandomLatency = 0
If no Janus.cfg is found, the default values for the IP Address and Port are 127.0.0.1 and 14242 respectively.
With Janus you can also specify parameters to simulate bad network conditions. The following properties are provided by the Lidgren Networking Library and can be set in the Janus.cfg file:
SimulatedLoss : This is a float which simulates lost packets. A value of 0 will disable this feature, a value of 0.5f will make half of your sent packets disappear, chosen randomly. Note that packets may contain several messages - this is the amount of packets lost.
SimulatedDuplicatesChance: This is a float which determines the chance that a packet will be duplicated at the destination. 0 means no packets will be duplicated, 0.5f means that on average, every other packet will be duplicated.
SimulatedMinimumLatency and SimulatedRandomLatency: These two properties control simulating delay of packets in seconds (not milliseconds, use 0.05 for 50 ms of lag). They work on top of the actual network delay and the total delay will be: Actual one way latency + SimulatedMinimumLatency + [Randomly per packet 0 to SimulatedRandomLatency seconds]
