OrMiS
From EQUIS Lab Wiki
Contents |
Install instructions
SVN
- Download the OrMiS project here is the SVN url: svn://equis.cs.queensu.ca:36666/branches/OrMiS_v3.2
The SVN contains only the file that cannot be generated so, you will have to build the project yourself. The last build or OrMiS have been successfully tested with Unity 4.5.4.
- Open the downloaded project from SVN with Unity. You will need Unity Pro, since OrMiS is using advanced features such as native library integration, render to texture at runtime and special shaders.
- Build the project on a Windows 8 platform in X86 (32bits). OrMiS can also been build in 64bits but there is not significant advantages and some minor modifications have to be applied to the code. This is explained later in the document.
- Double Clic on the .exe file you built, the launcher appears.
Files required to run as Standalone
The files stored on the SVN are only the files that are required in the project. This means that OrMiS have to be compiled.
- File: ormis.exe (or XXX.exe depending how you called the file during build)
- Folder: ormis_Data (or XXX_Data depending how you called the file during build)
- File: Configuration.cfg (contains all the configuration information chosen in the launcher)
- Folder: Maps (contains the maps with different layers and resolutions, the map description file and the scenario files)
- TimelineClient.ini (stores network information for Janus)
- TimelineServer.ini (stores network information for Janus)
How to Launch
Once build, you should have an .exe file. Double click on it, the launcher opens. The launcher is composed of 4 windows which offers multiple options.
- The settings windows enable to parameter OrMiS to launch it as a client, a server, with icons of different size, listening to various events on the network, choose the input method, etc.
- The QueensU window contains a set of buttons, which fill the setting window with preset values. These presets have been created specially for the Study called the workspace of the future conducted by Christophe Bortolaso in 2014.
- The Waterloo window contains buttons which fill the setting window with preset value also for the study called the workspace of the future but conducted at the university of Waterloo in 2014.
- The scenario window allows to choose the scenario to play. A scenario includes a map, a set of units with their position, a set of pre-created permanent routes, attachement of units to routes, etc.
File: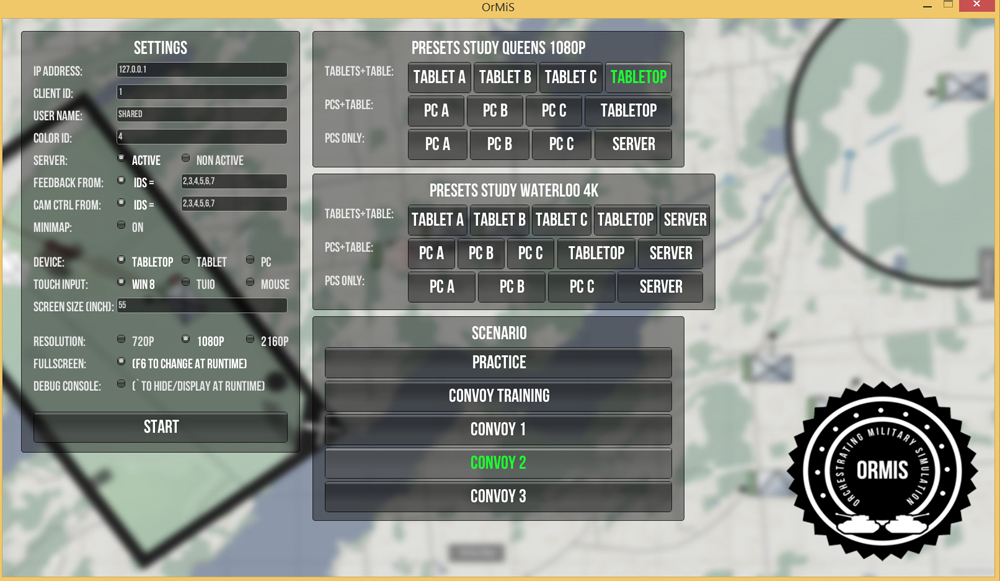
Settings
- IP address: the ip address of the computer which plays the role of the server
- Client ID: number determining the ID of the client on the network. Users should ensure that two client don't have the same number if connected to the same server.
- User name: Alphanumeric name used in the game, you can put whatever you want.
- Color ID: color used by the client. Only 4 Colors are available: magenta, blue, orange, purple.
- Server: determine if the server is launched on this client. Users should ensure that only one server runs.
- Feedback from: list of ids of clients from which this client listen to routes events.
- Cam CTRL from: list of ids of clients from which this client listen to camera feedback events (squares indicating the viewed zone and buttons to switch from a cam to another).
- Minimap: displays an additional minimap if set to on.
- Device: determine the type of device used. For example, PC will have smaller buttons and bottom left controls and tabletop will have bigger controls and controls on 3 sides.
- Touch input: the touch input to use: touch on Windows 8, touch on TUIO or Mouse+Keyboard
- Screen size (inch): the size of screen you are using. It changes the size of icons to make them easy to clic, touch.
- Resolution: the resolution to be used.
- Fullscreen: launch the app in fullscreen or not (can be changed at runtime by pressing F6)
- Debug console: activate the debug console and other features like being able to speed up the game with + and - on the numerical keypad. The console can be displayed and hidden by pressing ` (button on the left to the 1 on a standard qwerty keyboard).
Presets
The last version of OrMiS has been tested and built for 4 different kind of physical setups. These setups are
- Table only: QueensU preset first line. Choose the first table on the QueensU preset. The table is the server and the only client.
- 1 Table and 3 Tablets: QueensU preset first line. choose the Tablet A,B,C on the QueensU presets on the 3 different Tablets and Tabletop on the tabletop computer. The table is the server.
- 1 Table and 3 PCs: QueensU preset second line. choose the PC A,B,C on the QueensU presets on the 3 different PCs and Tabletop on the tabletop computer. The table is the server.
- 1 server and 3 PCs: QueensU preset third line. choose the PC A,B,C on the QueensU presets on the 3 different PCs and Server on another computer to play the server role.
With the presets the settings windows is filled with the good parameters. The only parameter that cannot be filled automatically is the IP address. Make sure that you enter the IP address of the computer that is going to play the server role on all the clients.
Maps
Maps are composed of :
- a set of PNG of different resolutions and organized in different layers (even if OrMiS support only the Vector layer for now).
- a map description file with a CFG extension
- a scenario describing the units, positions, routes, etc.
Map folder and the MapGenerator Application
Map File Description
Scenario File Description
For now, 3 scenario are available and accessible directly through the launcher. A scenario is a Map+Units+Units positions+Units type+Units visibility+Premade permanent Routes+Premade Permanent routes attachment. Scenarios are accessible in the Map folder and described in the XXX.snr file. Scenarios files are composed like that:
//the list of units is organized in factions, you can have two factions, Friend or Enemy and a faction contains a list of units.
- Factions
- Type = Friend (OR) Enemy
- Units (list of units)
- Unit
- Type: the type of unit (Armour, Antiarmour, Infantry, Reconnaissance)
- Longitude: the X world position in Unity
- Latitude: the Z world position in Unity (Y is the elevation)
- Orientation: the orientation in degrees (0 points to the north)
- Controlled: True or False, determines if you can interact with the unit
- VisibleOnSight: True or False, determines if you can see the unit only when visible by a controlled unit
- Unit
//Some permanent routes can be preloaded.
- Routes
- Route
- Visible: true or false, determines if the route is visible on screen
- Waypoint
- Longitude: the X world position in Unity
- Latitude: the Z world position in Unity (Y is the elevation)
- Waypoint
- Visible: true or false, determines if the route is visible on screen
- Route
//Units can be engaged on routes when loading, Route performers defines a list of association between routes and units.
- RoutePerformers
- Performer
- Route = ID of the route. The routes are numbered and given ID when loaded. The first route on the scenario file is 1, the second is 2, etc.
- Unit = ID of the unit to engage on the route. The units are numbered and given ID when loaded. The first unit on the scenario file is 1, the second is 2, etc.
- Performer
//Mission is described by a list of units to Kill and a list of units that should survive. If all the units in Kill are killed in the game a message will appears and says mission succeeded. If all the units in Survive are killed in the game a message will appears and says mission failed.
- Kill = list of IDs of units separated by comma. Same as for the route performers to identify a unit with a number look at their order in the scenario file. The first unit on the scenario file is 1, the second is 2, etc.
- Survive = list of IDs of units separated by comma. Same as for the route performers to identify a unit with a number look at their order in the scenario file. The first unit on the scenario file is 1, the second is 2, etc.
