Janus Cubes: A Unity Sample Application
From EQUIS Lab Wiki
Contents |
Introduction
JanusCubes is a simple application that demonstrates some of the features of Janus and shows how the toolkit can be used with Unity. In the application, each player can place cubes on the screen. Players can select one or more cubes, move them and delete them. The positions of all the cubes are synchronized between the players.
Getting Started
Download the Janus Cubes Unity Package.
Open the package.
You need to make two copies of the application. One that is a client only, and one that is both a client and a server.
In Unity, select the client_starter game object. There are two scripts attached to the client_starter:
- Timeline Server Starter
- Timeline Client Starter
The configuration needs to be slightly different for each copy of the application.
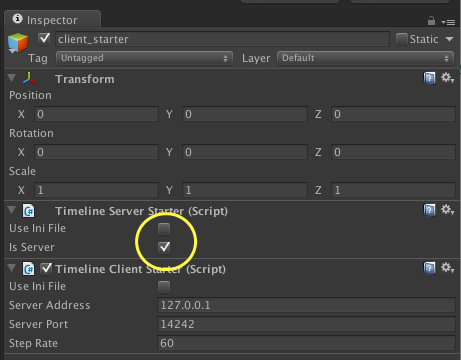
We only need to make a change to the Is Server variable in the Timeline Server Starter script. In one copy Is Server must be true and in the other copy it must be false.
Toggle Is Server to false. Then build and save the application.
Now toggle Is Server back to true.
Play the server version of the application from the Unity editor.
Now start the client only version of the application that you have just built.
Commands for Using Janus Cubes
Use the following commands to interact with JanusCubes:
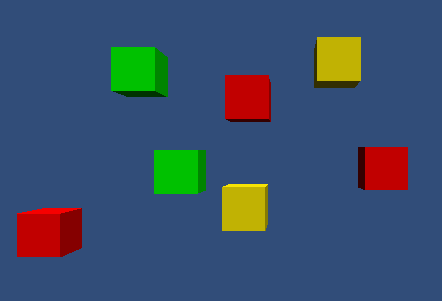
- C - create a cube at the current mouse position - a red cube appears on the local screen and a green cube appears on the other screen.
- Mouse left click- selects and deselects a cube - a red cube will turn yellow (green cubes can not be selected)
- WASD or Arrow Keys - move the selected (yellow) cubes
- X - delete the selected (yellow) cubes
Code Details
Now that you have run the JanusCubes program, it is time to have a look at the scripts that make it work. We will begin by looking at the network set up.
The Client and Server Scripts
As we have just seen, the client_starter game object has to scripts attached to it:
- Timeline Client Starter and
- Timeline Server Starter.
We will discuss each one of these scripts separately.
Timeline Client Starter
The Timeline Client Starter script is used to create the connection from the client application to the Timeline Server. Every application must start a Timeline Client. The Timeline Client Starter script provides a flexible interface for starting the Timeline Client. This script has four public variables:
- Use Ini File, if true will read the server address, port and step rate from the file TimelineClient.ini, otherwise the values below are used. The default value is false. If an ini file does not exist, one is automatically created. More details on the ini files can be found below.
- Server Address, ip address of the TimelineServer. The default is 127.0.0.1. If the server is not running on the local host, you must change this to the ip address where the Timeline server is located.
- Server Port, port to use on the TimelineServer. The default is 14242. It is recommended that you leave the port set at 14242.
- Step Rate, update frequency for the TimelineClient, the default is 60 times per second
In addition to starting the TimelineClient, the Timeline Client Starter script also initializes the behaviour for Unity Timeline classes such as Vector2, Vector3 and Quaternion.
Timeline Server Starter
The Timeline Server Starterscript starts up the Timeline Server. You must always have one (and only one) TimelineServer running. The Timeline server is responsible for passing messages between different clients who subscribe to various Timelines. One of the clients may run the TimelineServer or you may have an dedicated server application.
The Timeline Server Starterscript has three public variables:
- Use Ini File, if true will read the server address, port and step rate from an ini file, otherwise the values below are used. The default value is false. More details on the ini files can be found below.
- Ini File Name, name of the ini file. The default is JanusCube
- Is Server, indicates whether or not this client will run the Timeline server code. One (and only one) client must act as the TimelineServer
You will need to build one copy of the Unity Application with Is Server set to true and a second copy with it set to false.
It is often easier to just have one copy of the application and use an ini file to determine whether or not to run the server and other things that might change like the ip address of the server. The next section describes the ini files that are used by JanusCubes.
Ini Files
There are several ini files in the root Unity folder that control the synchronization. They are all automatically created if they are not present. The format and contents of each of the files is shown below.
TimelineClient.ini is used by the Timeline Client Starter script.
   ServerAddress = 127.0.0.1
   ServerPort = 14242
   StepRate = 100
TimelineServer.ini is used by the Timeline Server Starter script.
   Port = 14242
   MaxConnections = 32
   StepRate = 100
JanusCubes.ini is used by the Timeline Server Starter script.
IsServer = True
Or
IsServer = False
Controlling the Cubes
Two scripts are used to create cubes and synchronize the cubes between clients:
- CubeScript and
- CubeController
Cube Script
CubeScript is attached to the main camera. It create a single Timeline of type string. This Timeline is used to send commands to all clients to create and delete cubes. The Timeline has a string identifier of "command" and is named cubeCommand.
cubeCommand = TimelineManager.Default.Get<string>("command");
CubeScript listens to the EntryInserted event on the cubeCommand Timeline. The EntryInserted event is triggered whenever a new value is inserted into the Timeline either locally or on a remote client that has a Timeline with the same string identifier (in this case "command"). See Events for more information.
cubeCommand.EntryInserted += HandleCubeCommandEntryInserted;
In the CubeScript Update method, new values are inserted into the cubeCommand Timeline whenever the user presses the C key. The value inserted into the timeline is a string of the form "create",cubeNumber,clientIndex for example "create,3,1" to create cube 3 by timeline client #1
Note: Janus.TimelineClient.Index is used here to obtain the index number for the local client.
   if (Input.GetKeyDown(KeyCode.C))
   {
       cubeCommand[0] = "create," + cubeNumber + "," + Janus.TimelineClient.Index;
       cubeNumber++;
   }
Inserting this value into the timeline triggers the EntryInserted event on this client and on all other clients that have a timeline with the same name.
The HandleCubeCommandEntryInserted method is invoked.
   void HandleCubeCommandEntryInserted (Timeline<string> timeline, TimelineEntry<string> entry)
   {
The HandleCubeCommandEntryInserted method handles two types of commands: create and delete. The Value in the Timeline is a comma delimited string with the first field indicating the type of action.
       string[] tokens = entry.Value.Split(',');
       string action = tokens[0];
First we will look at create. For the create action, the second field is a cube number and the third field is the index for the client who initiate the creation of a cube.
      if (action == "create")
       {
           uint cubeNumber = unit.Parse(tokens[1]);
           short cubeCreator = ushort.Parse(tokens[2]);
In the script, we then:
- determine where to place the cube,
- instantiate the cube, and
- call the CubeController script on the cube game object we just created
       if (action == "create")
       {
           uint cubeNumber = uint.Parse(tokens[1]);
           // get the client id number of the client who initiated this command
           ushort cubeCreator = ushort.Parse(tokens[2]);

           // determine where the cube should be placed based on the mouse position
           var mousePos = Input.mousePosition;
           Vector3 cubePos = Camera.main.ScreenToWorldPoint(new Vector3(mousePos.x, mousePos.y, -Camera.main.transform.position.z));

            // create a new cube
            GameObject instance = Instantiate(cube, cubePos, Quaternion.identity) as GameObject;
            instance.GetComponent<CubeController>().Create(cubeNumber, cubeCreator);
       }
Delete commands are inserted into the timeline from the CubeController script. The delete command has the format of "delete",cubeName, for example "delete,cube2-0 for deleting cube 2 that was created by client 0. The Destroy method on the CubeController script on the applicable cube object is invoked.
       else if (action == "delete")
       {
           string stringId = tokens[1];
           GameObject instance = GameObject.Find(stringId);
           Destroy(instance);
       }
   }
Cube Controller
The CubeController script is attached to each cube that is created by the CubeScript.
Creating Cubes
When a cube is created, a Vector3 Timeline is also created to synchronize the position of the cube. All timelines have a unique string identifier. If two or more clients create a Timeline with the same identifier, then the values contained in the Timeline are synchronized. In this example, we create unique strings by concatenating the string Cube with a counter "cubeNumber and with the TimelineClient index (cuberCreator). We also use this string as the name for the game object
   gameObject.name = "Cube" + cubeNumber + "-" + cubeCreator;
   cubePositionTimeline = TimelineManager.Default.Get<Vector3>(gameObject.name);
By default, the values in the Timeline are sent over the network every time a new value is set. This can quickly exceed the network bandwidth. To help with this, a send filter can be added to the Timeline to reduce the frequency of message transmission. The filter can be based on either time or on how much the value in the timeline has changed or both. The BuildDeltaRateFilter that we add here only sends data if the position has changed by more than 0.05 or if more that 0.5 seconds (1/2.0 seconds) has elapsed since the previous message. See Send Filters for more details.
cubePositionTimeline.AddSendFilter(TimelineUtils.BuildDeltaRateFilter <Vector3>((x,y) => Vector3.Distance(x,y), ()=>0.05f, ()=>2.0f));
To keep track of which cubes were created by which client, we set a local variable "owner" to true if this client initiated the command to create this cube. We also colour the cubes red and green depending on who owns them.
   if (cubeCreator == Janus.TimelineClient.Index)
   {
       owner = true;
       gameObject.renderer.material.color = Color.red;
   }
   else
   {
       gameObject.renderer.material.color = Color.green;
   }
Updating and Synchronizing Cubes
In the Update method, we either set the position of the cube into the Timeline or we get the cube position from the timeline. The cube owner write to the Timeline and the other clients just read the position and copy it to the cube's transform. Note, when we get the position of the cube, we are getting the position at time -0.1. This means 100ms or 0.1 seconds in the past. We could get the position at time 0, but adding a small amount of lag can help account for network latency and provide smoother animation.
   if (owner)
   {
       // read input from keyboard and move cube
       // (code not shown)

       // write the cube position to the timeline
       if (cubePositionTimeline !=null)
       {
           cubePositionTimeline[0] = transform.position;
       }

   else
   {
      // get the cube position from the timeline
      transform.position = cubePositionTimeline[-0.1f];
   }
Deleting Cubes
The OnDestroy method removes the Timeline when the cube game object is destroyed
TimelineManager.Default.Remove(this.cubePositionTimeline);
Running In Background
If you are running multiple copies of Janus Cubes on the same computer, it may appear that the cubes are not being synchronized. This is because Unity, by default, does not update the background window.
To change this, either add this line to the Start method of CubesScript.cs
Application.runInBackground = true;
or in the Build Settings, click on Player Settings and make sure the box for Run In Background is checked.
