Liberi Developer Guide: Creating Dino Dash
From EQUIS Lab Wiki
Contents |
Intro
This is a guide designed to teach all the basics of creating your own minigames using the Liberi Framework. Following this tutorial, you will be recreating Dino Dash, an arena style egg-snatching game.
Check out a finished version of Dino Dash on YouTube: https://www.youtube.com/watch?v=1rZXLTaBobg
Getting Started
This section aims to familiarize you with the tools needed to get started working with Liberi and introduce the structure of the project folder.
Prerequisite Software
Before you start this tutorial, you should have Unity installed and Tortoise SVN (or another similar SVN client), see Liberi Developer Guide: Setup for more information. You may also wish to use a different IDE for editing C# code other than the version of MonoDevelop, we recommend Visual Studio Community Edition with the UnityVS Tools.
![]()
SVN Repository
For the tutorial, you'll want to work from a stripped version of the main Liberi branch found here:
svn://equis.cs.queensu.ca:36363/Cp Fit n Fun/branches/Tutorial
Once you've got an SVN client Checkout the Tutorial branch to your machine:
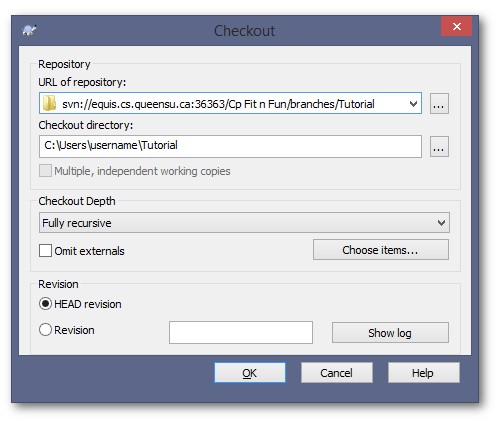
![]()
Project Folder Overview
Liberi Consists of 3 pieces of software:
- LiberiWorldServer
- This is the main entry point for Servers and Clients. All player profile information is stored here, as well as various world data files such as what items vendors sell and what loot enemies drop. See Liberi Developer Guide: Network Architecture for detailed information on the network hierarchy.
- LiberiServerPool
- This is a simple application that launches instances of the Liberi game to act as servers. A single Server Pool can host multiple instances of the game and will communicate with the World Server as to which servers it's currently hosting, how many players are connected to that server, etc.
- Liberi
- This is the Game Client, developed in Unity. It deals with the runtime logic and visuals of the game. A single Unity Project is used to maintain Servers and Clients, differentiated by which scenes are included in the build from Unity.
Builds
The Builds folder in the repository contains each of the three programs listed above in triplicate. The three copies are:
- Development
- These are the folders that are populated when you hit "Build" in your IDE or from Unity. They are primarily for testing/developing on your local machine.
- Debug
- These are the builds for testing remotely, typically in the lab. Stable versions of the builds are copied into these folders (using the public-"target"-debug.bat scripts found in the repository) and then the
Liberi_Clientfolder is distributed to people taking part in the test at the lab.
- These are the builds for testing remotely, typically in the lab. Stable versions of the builds are copied into these folders (using the public-"target"-debug.bat scripts found in the repository) and then the
- Release
- These builds (without and suffix on their folder names) are the release candidates. They should seldom be used unless their is an on going study that participants are pulling changes from.
Liberi
The Liberi folder in the repository contains the Unity Project folder, once opened in Unity, it will generate all the familiar looking files present in a Unity project (Temp and Library, C# .sln files, etc).
LiberiWorld.sln
This is the solution file for 3 of the C# Projects in the repository (LiberiNet, LiberiSereverPool, and LiberiWorldServer). Building this solution will populate the Development builds described in Builds.
Documentation
Contains the generated HTML of the Liberi code base. It was created using Doxygen and should be regenerated whenever the core components of the Liberi framework have changed/been expanded upon to keep the API up-to-date. See Documentation for more information.
Hello World
This section shows the most basic minigame you can possibly make in Liberi: one without avatars, goals, or graphics. Just a blank screen. Simple as it is, it will teach the basics of hosting a Server on your machine and connecting to said server from Unity. This will be the ideal method for testing your scripts as you continuously change and tweak them.
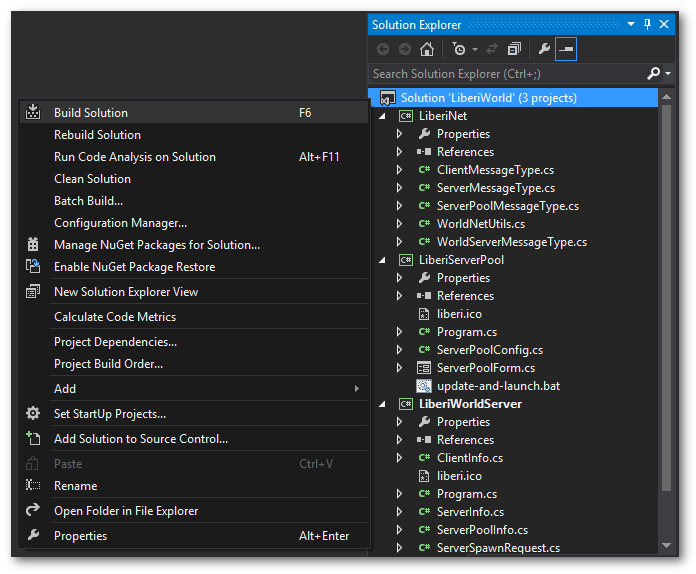
Build LiberiWorld.sln
Open the Visual Studio solution file LiberiWorld.sln and build it using your chosen IDE for C# development. This is a necessary step before attempting to use the "Run World" button in the Liberi Test rollout of the Unity project.
Create New Minigame
First you'll need to create the minigame's scene and default objects. This is taken care of by a wizard that will generate the necessary assets:
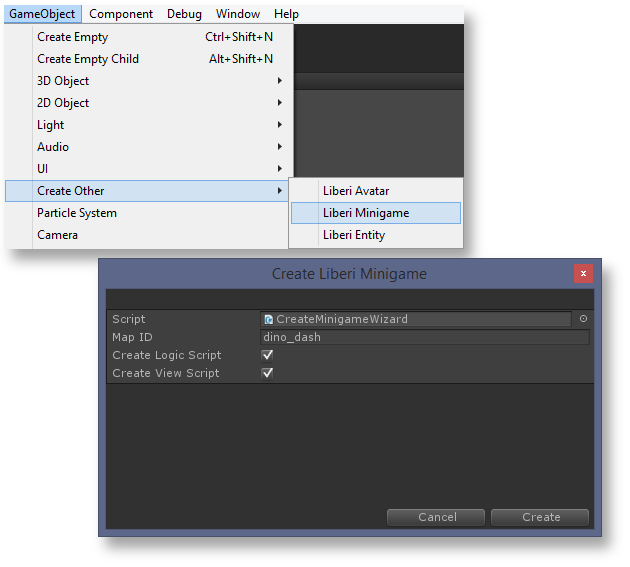
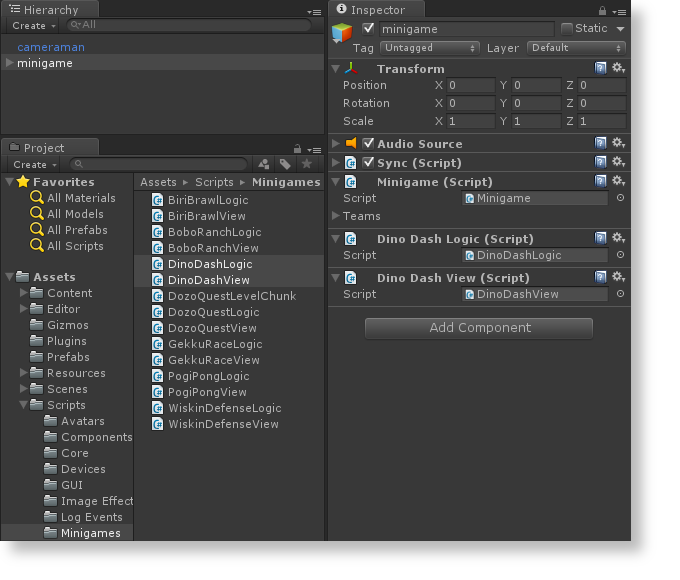
After running the wizard and naming your new minigame (following the all lower-case, underscore naming convention), a new scene will be created in Assets/Scenes/Minigames. Open the scene to see your newly created template minigame. As the post creation dialogue mentions, you will need to attach the generated Logic and View scripts (DinoDashLogic.cs and DinoDashView.cs respectively).
Configure and Build the Server
You now have a basic empty minigame ready to be loaded on to a client and server. There are several small things to watch out for before your game will be properly accessible:
- There needs to be a minigame portal that actually leads to your minigame
- In the Tutorial Project, stormy_town already has a a portal pointing to dino_dash
- It's worthwhile to take a look at the portal, specifically the map_id parameter of the attached
 MinigamePortal
- The minigame should be added to the Available Maps of the development server pool
- See
Builds/LiberiServerPool_Dev/LiberiServerPool.ini, a Jeli file specifying various attributes of the server pool.
- See
- From
Window>Liberi Testroll-out in the Unity editor, hit "Build Server"
Once the build process finishes, you can hit "Run World" from the test window. You should see two applications launch, one instance of Liberi World Server and one of Liberi Server Pool. The world server Event Log should print several lines regarding the server pool connecting and an instance of stormy_town being added. From Unity, open the client scene and hit play. If everything has worked so far, you should be spawned in stormy_town with dino_dash portal on the right side of the island. Attempt to enter the portal and see that you connect properly, to your new empty minigame.
![]()
![]()
![]()
- Connecting...
- Indicates the World Server is unreachable, because either it is not running or due to network/firewall settings.
- Cannot find world server.
- The WorldID Set in Tutorial/Liberi/Config/Network.ini is not listed in the servers file as described in Network Architecture: World IDs
- Cannot find server.
- Connection to the world server was established but the server your client is requesting is not listed on the world server. This could either mean that stormy_town is not running on the world server, or that the profile your client is using has it's LastZone parameter set some where other than stormy_town that is currently not running.
![]()
![]()
World/stormy_town_settings.dat specifies which portals are enabled.
Once you've successfully connected to your empty minigame, you're ready to move on and get an Avatar moving on the screen!
Video Tutorials
The video tutorials lead you through the creation of an Avatar, to a complete multiplayer minigame. The videos are hosted on the EQUIS Youtube page here:
https://www.youtube.com/watch?v=XSWsusFtUFY&list=PLOZk_qoXhYOk-1WgCbLRYnNwZPnxpzpKM
Below are the Code Listings for each video. They represent an example of how the code might look after the completion of that tutorial. It's best to follow along with the steps of the tutorials and write the code for yourself, but there are times when it will be convenient to view the source code or simply copy and paste a section.
Episode 2 Code Listings
![]()
Episode 3 Code Listings
![]()
![]()
Episode 4 Code Listings
![]()
![]()
![]()
![]()
![]()
Finishing Up
By the end of the tutorials above, you'll have dinos that can pick up an egg we placed in the arena and return it to their nest to score a point. You should have all the tools now to finish the minigame! Here's a checklist of some tasks you can do to complete Dino Dash:
- Make a Logic Script with a Sync Component that spawns more eggs into the center of the arena
- Use the
OnEntryPassedevent of Dino's Score timelines to detect when the get to the winning number of points - Define the winning number of points as a
MapSettingand set it using the dino_dash.dat file on the World Server (see World Data for more details) - Create a simple state machine for the minigame that keeps track of the state of the minigame
- Have the
DinoDashViewscript do a countdown at the beginning of the game - Implement the IRankable interface for
DinoViewand haveDinoDashViewregister new Avatars' view scripts to theMinigameRankingViewin theOnMinigamePlayerAssignedmethod - Fill in the
OnSkillUsedportion ofDinoLogicto give players a skill to use - Write
DinoBotBrainand haveDinoDashLogicadd bots when needed usingMinigame.Instance.AddBotPlayer()
Some of these tasks may seem challenging but use of Timelines and an understanding of how Logic and View are separated is all you need to check them off. You may also wish to refer to the completed version of the game in the main Liberi SVN repository to see how my implementation was done!
